During the use of drones, is it often neglected the maintenance work after use? A good maintenance habit can greatly extend the life of the drone.
Here, we divide the drone and maintenance into several segments.
1. Airframe maintenance
2. Avionics system maintenance
3. Spraying system maintenance
4. Spreading system maintenance
5. Battery maintenance
6. Charger and other equipment maintenance
7. Generator maintenance
In view of the large amount of content, the entire content will be released in three times. This is the first part, which contains the maintenance of airframe and avionics system.
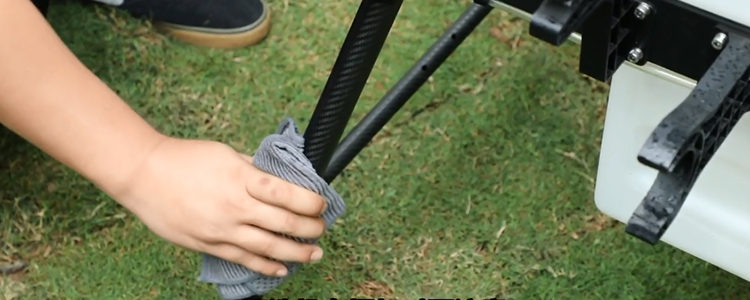
Airframe Maintenance
(1) use a wet rag to wipe the outer surface of other modules such as the aircraft front and rear shell, main profile, arms, folding parts, stand and stand CNC parts, ESC, motor, propeller, etc. clean.
(2) carefully check the fixing screws of the main profile, folding parts, CNC parts of the stand, etc. one by one, tighten the loose screws, and replace the screws immediately for the slippery ones.
(3) check the motor, ESC and paddle fixing screws, tighten the loose screws and replace the slippery screws.
(4) check the motor angle, use the angle meter to adjust the motor angle.
(5) for the operation of more than 10,000 acres of aircraft, check whether there are cracks at the motor fixed arm, paddle clip, and whether the motor shaft is deformed.
(6) paddle blade broken timely replacement, paddle clip gasket wear timely replacement.

Avionics System Maintenance
(1) the residue and stain inside the harness connector of the main control, sub-board, radar, FPV, ESC and other modules using alcohol cotton to wipe clean, dry and then insert.
(2) check whether the wire harness of the electric steam module is broken, pay attention to the RTK, remote control receiver harness must not be broken.
(3) the battery copper interface of the sub-board using alcohol cotton to wipe one by one to remove copper rust and black firing traces, such as copper obviously burned melting or bifurcation, timely replacement; clean and dry after applying a thin layer of conductive paste.
(4) check whether the sub-board, the main control screws are loose, tighten the loose screws, replace the slip wire screws.
(5) check the battery bracket, bracket pulley, silicone gasket damage or missing need to be replaced in a timely manner.
Post time: Jan-10-2023